Have Questions? Contact Us Now!
- By MN Brow Lash & Medspa Academy
How to take Perfect Before & After Pictures of Clients
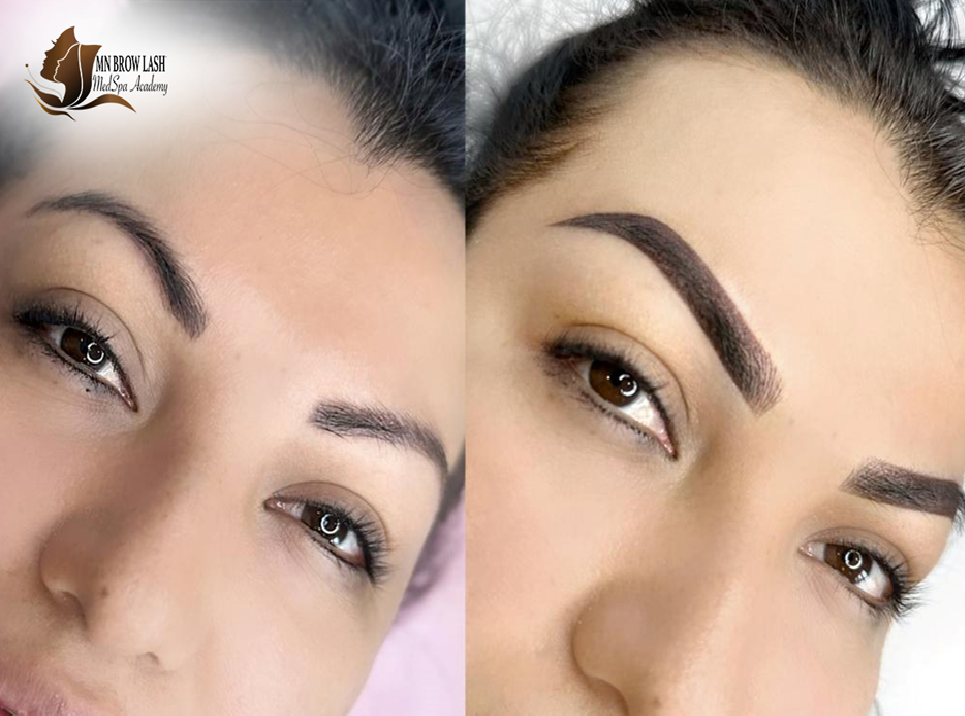
In the world of beauty and wellness services, before and after pictures are crucial for showcasing the incredible transformations your clients undergo. These powerful visuals not only serve as a testament to your beauty skills and expertise but also help potential clients envision the remarkable results they can achieve. In this comprehensive guide, we’ll explore the art of taking perfect before and after pictures, ensuring you capture every detail and highlight the fantastic work you do.
Why Before & After Pictures Matter
Before and after pictures are more than just simple snapshots – they are powerful marketing tools that can significantly impact your business’s success. Here are a few reasons why these images are so important:
1. Building Client Trust: Visually demonstrating the results you can deliver helps build trust and confidence with potential clients, making them more likely to choose your services.
2. Showcasing Your Expertise: High-quality before and after pictures showcase your skills and attention to detail, setting you apart from competitors and positioning you as an expert in your field.
3. Upgrading Your Portfolio: A strong portfolio of before and after images can attract new clients and help you expand your business, as these visuals speak volumes about the quality of your work.
3. Inspiring Clients: Seeing the transformative power of your services can inspire and motivate clients, encouraging them to commit to their desired goals and follow through with recommended treatments or products.
Preparing for the Perfect Shot
Before you start snapping away, there are a few essential steps to ensure you capture the best possible before and after pictures:
1. Choose the Right Lighting
Proper lighting is crucial for capturing clear, detailed shots. Natural daylight is often the best option, as it provides even, flattering illumination. If shooting indoors, use professional lighting equipment or position your client near a large window to ensure sufficient light.
2. Set Up a Consistent Backdrop
To accurately compare before and after shots, it’s essential to use a consistent backdrop. A plain, neutral-colored wall or backdrop stand works well, as it eliminates distractions and allows the focus to remain on your client.
3. Prepare Your Client
Ensure your client is camera-ready by having them remove any jewelry, ties, or accessories that could create unflattering shadows or reflections. Additionally, instruct them to wear form-fitting clothing that won’t obscure the treatment area.
4. Mark Reference Points
To ensure consistent positioning between before and after shots, mark reference points on the floor or backdrop where your client should stand. This will help you capture the same angle and framing in both sets of pictures.
Capturing the Perfect Before Picture
The before picture is the foundation upon which the transformation will be showcased, so it’s essential to get it right. Follow these tips:

1. Full-Body Shot: Start with a full-body shot that captures your client’s entire figure from head to toe. This provides context and allows for a comprehensive assessment of their overall appearance.
2. Close-Up Shots: Next, take close-up shots of the specific treatment areas, such as the face, eyes, lips, or body parts. These detailed shots will highlight the areas that will transform.
3. Multiple Angles: Capture multiple angles of the treatment areas to ensure you have a well-rounded representation of your client’s starting point.
3. Consistent Positioning: Ensure your client maintains consistent positioning and facial expressions throughout the before shots, as this will make it easier to replicate the angles and expressions in the after shots.
Capturing the Stunning After Picture
Once your client has undergone the desired treatment or service, it’s time to capture the stunning after pictures. Follow these steps:
1. Replicate the Before Shots: Recreate the same angles, positioning, and facial expressions from the before shots to allow for an accurate comparison.
2. Capture Multiple Angles: As with the before pictures, capture multiple angles of the treatment areas to showcase the full extent of the transformation.
3. Highlight Key Areas: Take close-up shots that specifically highlight the areas where the most significant changes have occurred, such as smoother skin, fuller lashes, or more defined brows.
4. Consider Additional Shots: Depending on the service provided, you may want to capture additional shots that showcase the results in action, such as your client smiling, moving, or engaging in relevant activities.
Editing and Improving the Images
While it’s important to capture high-quality images from the start, some post-production editing can further enhance the before and after pictures and make them truly pop:
1. Consistent Editing: Apply consistent editing techniques to both the before and after shots, such as adjusting exposure, contrast, or color balance, to ensure a fair comparison.
2. Crop and Straighten: Crop the images to focus on the most relevant areas and straighten any tilted or skewed shots for a clean, professional look.
3. Remove Blemishes: Use editing tools to remove any temporary blemishes or imperfections that could distract from the transformation.
4. Add Annotations: Consider adding annotations or text overlays to the before and after shots, highlighting the specific treatments or services performed and drawing attention to key areas of transformation.
Showcasing Your Work
Once you have a stunning collection of before and after pictures, it’s time to showcase your work and attract potential clients:
1. Create a Portfolio: Compile your best before and after shots into a professional portfolio that you can share with clients during consultations or feature on your website and social media platforms.
2. Share on Social Media: Regularly share your before and after pictures on social media platforms like Instagram, Facebook, and TikTok, using relevant hashtags and captions to increase visibility and engagement.
3. Display in Your Studio: Print and display your most impressive before and after transformations in your studio or treatment area, allowing clients to see the incredible results you can achieve firsthand.
3. Use in Marketing Materials: Incorporate your before and after pictures into marketing materials such as brochures, flyers, and email campaigns to showcase your expertise and entice potential clients.
Remember, always obtain your client’s permission before sharing their before and after pictures, and respect their privacy by following any requested guidelines or limitations.
In the beauty and wellness industry, before and after pictures are more than just images – they are powerful storytellers that showcase the incredible transformations you can create. By mastering the art of taking perfect before and after shots, you’ll not only build trust and credibility with potential clients but also inspire and motivate your existing clientele to continue their journey toward their desired goals. So, get ready to capture those stunning transformations and let your work speak for itself! Join MN Brow Lash & Medspa Academy to learn about client care and capture stunning client transformations and showcase your expertise..
FAQs
1. Why are before and after pictures important for beauty/wellness businesses?
Before and after pictures are crucial for building client trust, showcasing your expertise, enhancing your portfolio, and inspiring potential clients by visually demonstrating the transformative results you can achieve.
2. What are some essential tips for taking great before pictures?
When taking before pictures, ensure proper lighting, use a consistent backdrop, have the client prepare by removing accessories, and mark reference points to maintain consistent positioning for the after shots.
3. How can I capture impressive after pictures?
To capture stunning after pictures, replicate the same angles, positioning, and facial expressions from the before shots. Take close-ups highlighting key transformation areas and consider additional shots showcasing results in action.
4. How should I edit and showcase my before and after pictures?
Edit before and after pictures consistently, crop and straighten images, remove temporary blemishes, and consider annotations. Showcase your work through a professional portfolio, social media, in-studio displays, and marketing materials with client permission.


